Over the last couple of years I have been going through my stash of things I bought at craft fairs and trying to use a lot of it. I have moved my sewing studio twice so I keep seeing these experimental materials. Late last year I found my pile of Angelina film.
It is a coloured film that is sometimes cut up into shreds and sold as Angelina fibre. I prefer the effects of the film so I decided to experiment with ways to use it.
Angelina when heated will stick to itself. You can heat it with an iron or a heat gun for different effects. I like to set my iron to silk as any hotter makes the film melt too much and go a copper colour all over. If ironing use baking paper or a craft sheet to protect your iron or it will stick. If using a heat gun take it outside or make sure you use a mask to protect your lungs. I usually double it over so it is a little thicker and easier to stitch with a machine. This sample was first heated with a heat gun to make holes then ironed flat.
The heat gun makes the film bubble and shrink as in the sample on the right (single layer). It also concentrates the colour. The sample on the left is the same film but only folded in two and ironed.
You can also layer different colours and iron them together. It will all melt into one large piece of film. On the right you can see the bubbles formed when this sheet is then heated with a heat gun.
The colour of the background you place your altered film on changes the way the metallic colours show up. On dark backgrounds you see more of the coppery colour but on light backgrounds you can see the colour of the film.
You can also trap the fibres between two sheets of film. Simply lay fibres on one piece of film then cover with another and iron or heat gun it.
You can also trap other items like confetti sequins and glitter.
Here I have trapped a skeleton leaf between two different colours of film. The pink side was an extra layer of film that I crumpled before I ironed it onto the already trapped leaf. I also turned my iron up a little to melt the pink layer a bit more than usual.
Another way to apply the film is to crumple it before you join it together. If you crumple it a lot you will get the rough texture you see here.
It is possible to make impressions in the film using rubber stamps or wooden block stamps. In this sample I mage a multi-coloured sheet of film then inked up a rubber stamp. I placed the stamp ink side up on a hard surface and carefully put the film sheet on top. After I covered it all with baking paper I pressed hard with my iron. The ink makes the design stand out more but you don't always have to use ink.
Here I have used a borrowed wooden block stamp to make the impression. It wasn't clean so some of the paint came off onto the back of the film. It looks very different on the light and dark backgrounds.
One of my favourite ways to attach the film to fabric is using fusible web. You can get it with a paper backing (usually called Vliesofix, Bondaweb or Fuse-Under) or without. I prefer the paperless fusible as it is usually cheaper and I never use the paper anyway. Simply layer one piece of fabric, one piece of fusible and one piece of film, cover with baking paper then iron. You will end up with a very smooth metallic fabric.
You can stitch your Angelina to fabric before you alter it if you wish. It changes the way it reacts. When heated it shrinks a bit but if stitched down that doesn't always happen. This sample was layered then stitched together before I ironed it.
In this sample I laid sari silks on my ironing board then placed a piece of fusible web on top. I covered it with one piece of flat film and one piece of crumpled film. When I ironed it all together it became one piece of fabric. The different colours of silk make the film look multi-coloured.
Some of my more exciting (to me) experiments came later on. This sample was fused to fabric with the iron and fusible web. I then put it through an embossing machine to get quite a well defined embossed metallic fabric. It was bit shiny so I used watered down brown acrylic paint all over it and let it almost dry before wiping it off. This gave a distressed, less shiny look that I really like.
This piece of fused film was given a coat of crackle medium. When it dried I painted it with white acrylic and again left it to dry. As a final finish I sprayed it with mica spray because it was too bright. Although hard to see in this photo you can see the shiny background through the cracks.
On another piece of fused film I used a stencil and texture medium to make a pattern. The middle area has the texture medium applied with a palette knife. I also tried a light coat of gesso on the left side that I drew a design in with the end of my paint brush. When dry it was also given a spray to add more colour. All of these medium stuck to the film without any problems so I think you could use any acrylic mediums you fancy.
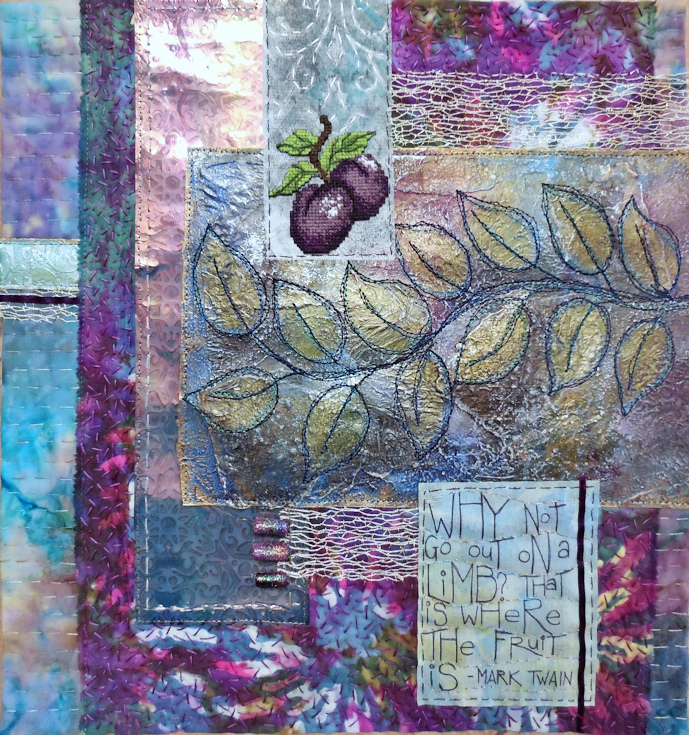
After all of these experiments I had a pile of different pieces of film. I stitched them all onto this background and added a lot of detail with hand and machine stitching. It was very difficult to take a photo where you could see the details so I apologise for the bluriness.
This photo shows how shiny it is.