Showing posts with label book. Show all posts

Sunday, October 31, 2021

A little bit more textile art.

 At our Christmas windup in 2020 my textile group was given a gift pack of fabrics, beads and ribbon. The colours in the pack inspired me immediately and I thought it would make a great book. We were then challenged to make something over the break and bring it to our first meeting in February. I took it home intending to make a small pocket sized book of about 6 pages with hand stitching. 

I went through my stash looking for something to use as the main subject for my little book. I came across a pile of sample screen prints that I had done for a class I was teaching several years ago.  I decided to make my book using them. The main print I wanted to use was about A5 size so my little book grew into something larger. I added a few extra fabrics from my stash that went with the ones I had been given. I also included a few fabrics of my granddaughter's paintings that I had scanned and printed at home because they colour matched the rest. 

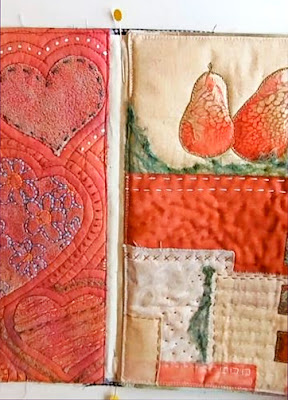
 This is the book cover and the first screen print that decided how the whole project would look. The flower sequins were part of the gift pack.

 The inside cover.


 The first page


I added quotes to the pages by printing on paper then later ironing interfacing to the back to make them stronger. They were glued to the page then secured with stitching. I love the way this came together and it was quick as I only added a bit of hand stitching to secure the fabrics. Some machine stitching was used as well to add variety to the stitched mark.

Thursday, December 13, 2018

A big twist on a WOWbook lesson

I have mentioned once or twice already that I have been doing the workshops in the WOWbook series. This eco-dyeing onto paper was one of those workshops I wanted to try. For full details you will need to get the book from the d4daisy website. 

I changed the technique a little by using procion dyes spread over the paper before I sandwiched it with leaves and more paper. I expected the dye to disperse in the pot but it didn't do that at all. The colour is a lot stronger than I had anticipated but I still like the way it turned out. The paler pages were not dyed but did pick up dye from the water.


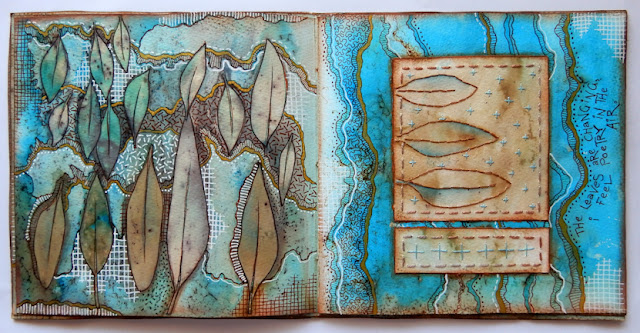
I liked the way the prints turned out so I made then into a book. I kept a couple of pages out to use for collage in the book. I also wanted to stitch on the extra pages so the back of the stitching would be hidden when I glued them into the book.  I used coloured pencils to outline the leaf prints and added shading around some of the images.


 After a couple of weeks I decided to add doodles to make the book more interesting for the viewer. I used a white pen and fineliners for the extra drawing.

 
 I also used steel wool fibers on the leaves for rusting. These became the dark dots you can see everywhere. One day, when I was pulling apart steel wool for rusting I didn't realise that little fibers were falling off the metal onto the fabric below. After I left my bundle of fabric to rust I unwrapped it all and was surprised to see little marks and dots everywhere. I liked the effect so it is something I do quite often now, when I am rusting cloth.


 Here you can see the difference in the before and after the extra drawing. I kept the colour palette consistent throughout the journal but did whatever drawing I fancied on each page.


 I wasn't sure what I was going to do with the left page here so it was one of the last ones I finished. I also used gold pen throughout the book for highlights.


 I added a few quotes about leaves to the book and also wrote the names of some of the plants I used for the prints. You can see one name in the bottom left area.


 Sometimes I used the doodles to hide areas of eco-printing that weren't as nice as I would have liked.


 I mainly used stranded embroidery thread for stitching but on a couple of pages I used a metallic gold thread, as in the crosses above.


 It was interesting to see how some plants reacted so differently to the dyeing process.


 All of the leaves on the right hand page came from the same eucalyptus plant. Some were green and some had turned red. I was surprised that the red ones dyed the paper browner than the green ones.


 There were a lot of steel wool fibres on the page on the right. I used the image to hide some of the darker areas.


 The page on the left here is one of the paler ones that didn't have dye applied to it but did still have the print of the leaves on it. I did use coloured pencils to make the blue areas darker. I always do what I think a piece needs and am never afraid to try something different. If it doesn't work the way I want,  I change it or use it in another project.

This little journal was a great piece that I could work on whenever I finished something and was looking for a small project to keep my hands busy while I planned the next thing. One of the reasons I love WOWbook so much is that it covers all sorts of mixed media and textiles. It pushes me to think of how I can adapt a technique when I don't have all the required materials to hand. The only reason I used dye here was because I didn't want to wait 3 weeks to make iron water as instructed and it was the first thing I saw when I looked in my cupboard for something else to use. I do like this technique and have since repeated it with a more diluted dye.

Sunday, December 24, 2017

Binding loose journal pages into a book.


Regular readers of my blog will know I love making books as over the years I have shared a few book making techniques. Today I am sharing a video I made recently of the technique I did for my Life Book project in 2012. It is handy when you want to join loose  pages into a book. It is the same hidden hinge method I used in 2012 but I do it a slightly quicker way than I used to so it is a more refined technique these days.


If you want to watch it larger than it appears here go to my You Tube channel where you can view the video larger. I used the technique to finish off my Colour Me Positive 52 week project for this year. I have really enjoyed this project and will continue doing more art journaling next year but I don't know how much I will be able to fit in between the textile projects I want to do.

Here are a few photos from the video to remind you of the steps:

 1. Join your pages together in pairs then glue each pair to the next one to make your book.
 2. Glue a fabric scrap to the spine for strength. Leave to dry overnight.

 3. Make your cover with cardboard and fabric or paper. Ensure the spine is flexible.

 4. Attach the cover and when the glue is dry stitch through all layers to secure the pages inside to the cover. You can use matching thread for stitching or make a feature using glittery thread. It just needs to be a strong thread or even wool. I used 3 strands of embroidery thread.
This is a close up view of the stitching. You could attach beads to the ends of your thread if you like. Thanks for reading my blog and if you have any questions you can contact me via the contact form near the top right of this page or use the comments below.

Monday, February 27, 2017

How I make a fabric art journal

 Today I am sharing the instructions for my fabric art journals. I forgot to take photos as I went along because I was filming for the video so I have a few pictures I saved from the film, sorry about the quality. You will get more detail in the video but this is a quick recap.


I start with a bunch of finished pages. It needs to be an even number of pages.  Use any technique you want to make your pages and finish off the edges neatly. Some methods I used for edges were folding over excess fabric to the back, binding, leaving felt untouched or satin stitch. I like all my pages to be the same size and I make them letter size (A4 metric) because that is easy to handle under my sewing machine.


I place a strip of fabric between the first and second pages. It doesn't matter how wide you make it but I like it to be almost the length of the pages. I match the outer edge of the pages and pin them first then pin the fabric strip in place. Stitch all the way around your two pages to hold the strip in place and connect the first two pages together.


 I place the third page on top then pin the extra piece of fabric strip to it. I add the fourth page and matching up the outer edge again I pin it in place. I stitch all the way around the two new pages and catch in the fabric strip.


 This makes a 4 page signature that is connected by the fabric strip in the middle as you can see here. At this stage it is very sturdy.  Do that to all your pages so they all become grouped together. Next we will make the spine and attach it to all those 4 page signatures.


I stack my pages and measure the width I want the spine to be. I also measure the length of the pages for the length of the spine. I cut that piece out of stiff interfacing (stiffener or vilene etc). I cut a piece of fabric to attach the spine to and also allow some excess fabric that will be inserted into the cover to hold it on.  I fold over the ends for neatness.


I pin the interfacing part of the spine, close to one edge, to the fabric strip connecting the pages of the first signature. I make sure it is pinned straight before I stitch it in place.


 The stitched signature. After the first one is attached I then add the rest, one at a time, making sure I line up the top and bottom edges so the book is square.


 When all the 4 page signatures are attached to the spine the inner part of your book will be complete and all you have to do now is attach a cover to that excess fabric strip.


I pieced my cover together here but usually I do it with one piece of fabric. This shows the interfacing applied to the fabric cover, heavy stiffener front and back but light stiffener on the spine area. I did the cover interfacing the same size as the pages. The cover fabric I measured by wrapping the material around the closed book. Do not open the book flat and take a measurement because it will be too short for the book to close.


I stitched the inside cover, just a plain piece of fabric, right sides together to the cover then folded it out to hide the seams. Here I have folded out one side only so far.


The completed cover with both sides folded out. You can see the inside edge of the inside cover is folded under for neatness.

I pinned the excess fabric from the stack of connected pages between the front and inside covers then stitched it all together. I tried to get the inside cover edge as close as I could to the first page, Leaving just a small gap of the spine showing.

Next I pinned the back excess fabric strip into the pocket between the back cover and inside cover. I stitched that together and then book is finished. At the end of the third video I shared the binding method of attaching a cover. Here are a couple of closeups of that binding.


Fabric art journal videos

I have finally made my fabric art journal videos. In the next post I will put a summary of the technique so it will help refresh your memory after you have watched the videos if you wish to tackle this project. To see the videos a bit larger go to my YouTube channel here:
https://www.youtube.com/channel/UCks2IH1v5APqojPnmnDA64Q


Video 1 covers the introduction, preparing pages and joining them together.


Video 2 shows how to attach the pages to the spine and getting ready for the cover.


Video 3 shows how to attach the cover. I also show an alternative cover with binding. 

I hope you enjoy my first videos. I learned a lot along the way and will probably do more video in the future, with less errors, ha ha. 

Thursday, February 16, 2017

Fun fabric journal pages

These are the final pages for my 2016 art journals. I made so many pages this year that I ended up making two books.


 This page was an experiment using the Prisme paints, inspired by the Workshop on the web lesson I did last year. It is very shiny so it hasn't photographed well. I used a stencil design and painted it with Prisme. When it was fully dry (about 2 weeks) I glued it to felt and used it to make this page. I have also added a couple of left over pieces of the forest floor page I showed in the previous post.


This is another of the Workshop on the web lessons. It is done on canvas and is a mixed media experiment. It is currently my calendar picture for the year so will end up in next years fabric journal. 


This page is a paper collage as inspired by Workshop on the web. I used a lot of paper I had previously printed and stitched it after I glued it to the page.  I added the quote with a permanent marker.


When I used mica spray to change the color of the background the printed surface became sticky so I sprinkled on embossing powder and heat set it. You can see in this closeup how shiny it is.


This is the cover of my second book. It is another one of the workshop on the web lessons and was a very experimental journey, my favorite kind of art. 


My finished books that I will show you how to make next time.