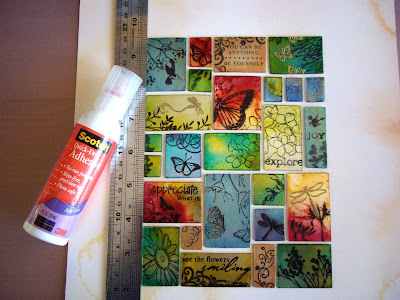
Now that you have colored all of your tiles it is time to add the images. I do this with stamps. I suggest you use some of the extra curved pieces of CD we saved to practice stamping on first so you get the feel of it. When stamping on the alcohol inks you can not wipe it off if you make a mistake because it will take off the color as well so you only get one go at the stamping unless you want to redo the tile from the beginning.
I start by selecting quotes or words that will fit on the tiles and stamp them using archival ink. You could use Stazon or other brands that work on glossy surfaces, I just find the archival is less slippery for me. Next I stamp a selection of insects and birds. I try to keep the butterflies and birds pointing towards the center of the picture, I think it looks more balanced that way. I also think it looks better to use have some of the images stamped off the edge of the tiles, like the large butterfly in the middle.
You can heat emboss some of the images. It is important to use an antistatic powder on the tile first (like the embossing buddy) because the embossing powder will stick to the whole tile if you don't. After I wiped the tile with the powder I stamped with Versa Mark and then used fine gold embossing powder on the image. When all the insects were stamped or embossed I stamped the large flowers. Then I used a variety of flowers and scroll stamps to fill in the rest of the tiles. You can leave some of the tiles blank if you like the way the color looks. I try to have the flowers towards the bottom pointing upwards and the branches near the top pointing down. It leads your eye to the center of the picture. The tiles need to be left overnight to dry or you can speed this up with a heat gun. Just make sure you do that in a well ventilated room.
When you are happy with the overall picture you need to glue the tiles onto the background. You could use double sided tape instead but I like to use the glue so I can move the tiles to get them straight when they are in place. I used Scrapbooking cardstock for all my backgrounds, but you could use anything you like. You could even glue the tiles onto a canvas that you have painted first. I used a ruler to get the edges straight because it would have been noticeable when framed if they were wonky. I started with the 4 corners and glued them down first. I then do the tiles on each side trying to keep them fairly evenly spaced. Lastly I glue the tiles in the center and the picture is done. If I am doing an uneven layout like my first piece I would start gluing in the center of the picture and then glue the other tiles in place around that center one.
I have tried to be as detailed as possible but if you have any questions don't hesitate to ask. I enjoy talking to people.


No comments:
Post a Comment