Thursday, December 11, 2014

Using your stash in a new way.

I am sharing a painted book I made and finished recently. It is a little wooden scrapbooking album that has a swirly cover and three wooden pages. It is made by Kaisercraft.  They have quite a few different designs and styles available. 

I didn't do any preparation other than sanding the edges to make them smoother. I wanted the background layers of paint to soak into the wood so I didn't seal it first but you could if you want a smooth white surface to paint on (either with sealer or gesso). I know that the unsealed wood will eventually make the paintings yellow a bit but I am happy to allow that to happen so it looks old. I used photos of flowers that I have taken so there are no copyright issues and I used Jo Sonja's acrylic paints throughout the project.

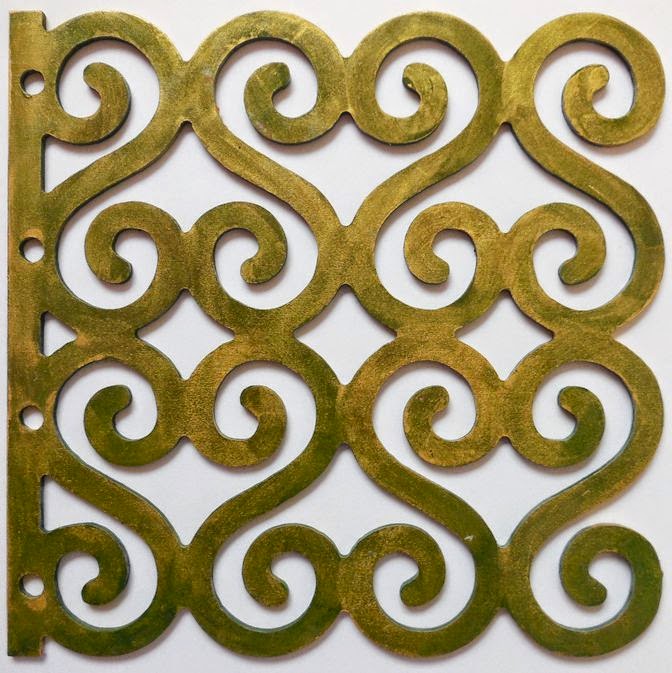
This is the book cover. I painted it green then added some patchy gold paint for a distressed look. I also used the gold paint on the edges of the pages so it looks golden when the book is closed. 

 This is the first flower I painted. I went for a realistic style for this one and decided to stay with that for the rest of the book. It is a beautiful Camellia in my garden. The flowers always look so perfect on this plant. It is one of my favourites.


 Another Camellia from my garden. They grow so beautifully here in Perth, so I have a lot of them. Sometimes when I am taking photos to use as paintings I take lots of different angles to add interest to the composition.

 These flowers are known as Everlastings or Paper Daisies because their petals are dry like paper and make a rustling sound when touched. I took this photo at a national park's wildflower festival. It was a little more difficult to paint because of the many layers of flowers but I do like to challenge myself.

This is one of my favourite Jonquils from my garden. There are so many flowers on each stem and they last for ages. I had to lay on the ground to get the photo because I couldn't see the flower properly from a standing position. 

These unusual looking flowers are known as a Qualup Bell. I took their photo at the wildflower festival too.

The last page in my book is of some Lisianthus that I was given by my husband. They looked so good in the vase I took a bunch of photos for future reference. It is a good idea to take photos of flowers you receive so you have a stash of copyright free images you can use in any art or crafts you like.

I used a spray varnish to protect the paintings when I finished and now have the book on display in my home. The wooden pages means it can stand by itself and when I tire of looking at one page I can turn it over to look at a different flower for a while. It is a great way to use something from my scrapbooking stash to make art and I don't have to find more wall space for another 6 paintings.

Friday, November 21, 2014

Apron makeover

After ruining many nice clothes with paint I have been wearing aprons when I make art for sometime now. I was looking at my favorite paint splattered apron and decided to paint it. I was not covering up the mess, just making it prettier for myself.

I started by gathering up all the sparkly fabric paints I have. They are mostly Lumiere paints and some Stewart Gill fabric paints. I decided to go with a variety of color but it would look awesome too if you did a monochrome or two color scheme. I also got out all my favorite stencils to use, picking the ones that had a small overall design. I wanted to cover a lot of the background of the apron.

I then got out half a dozen stencil brushes to use so I wouldn't have to wet them until I had finished. Wet brushes makes the paint run under stencils so if you only have one brush and have to wash it out between colors then make sure you dry as much of the water out of the brush each time.


 The fabric paint is fairly wet but I wasn't worried about creating perfect lines so I used it as it was. If you want a crisp image you need to blot the paint onto a paper towel after you load the brush each time. I just put down a stencil and colored it in with paint using the brush in a circular motion. I then added another stencil overlapping the first one and filled that in too.


Here you can see how I left the first stencil in place while I did the next one. When I finished with a stencil I took it away and put it straight into a tub of water. I didn't want the fabric paint to dry on the stencil and ruin it. If you allow thick paint like this to build up on your stencil you will no longer get a good outline when you use it. I kept adding stencils until I had filled in the whole apron. If you really look you can still see some of the original paint marks but I don't mind that. I am sure it will get more paint on it in the future, haha. 


 I tried to overlap the stencils so there wasn't a clear outline of the border. The stencils with thinner lines didn't work as well as the bold lines did. This idea could work on lots of items like bags or scarves as well. I let it dry for a couple of days and then heat set the fabric paints to make them permanent.


A close up where I tried to catch the shine of the paints but you can't really see the sparkle here. All of the paint I used is metallic so you can imagine how shiny it looks. I did a thick application of paint to cover up the dark background but you could go for a softer look if you wanted to, especially if your fabric is pale.

When I go into my studio now and put on my sparkly apron I feel so happy that I want to get creative right away. I hope you have fun with this technique.

Sunday, November 16, 2014

Final cards of the challenge.

I have finished the 52 card challenge ahead of time because my hubby is having a major operation on Dec 1 so I don't think I will be able to get much art done for a while after that. I will share my final cards today. 


 Week 41 - miniature. I wasn't sure what to do for this prompt so I looked through my  image collection for inspiration. When I saw the farm animals I decided to use them. I wanted to make them look tiny so I put them onto the hand. The miniature farm idea came when I was working out what to write on the card. It is mostly acrylics and collage.


 Week 42 - enchant. I used an old piece of painted paper for the background and added the image. You can't read it but the writing is the dictionary definition of enchant. I added gold embossing around the edge of each piece.


 Week 43 - stem.  I used another prepared background for this card and a cut out image. the stitching was done with a pen.


 Week 44 - mask.  I covered the card with gesso and used a pen to draw the pattern. I cut the mask out of previously painted paper and glued it on. I used a pen to do the stitching on the mask.


 Week 45 - night. I know I have used this image before but it is a favourite. This is another painted paper glued to the card. I used a credit card to spread the paint over the paper. I added stars and dots around the edge with a white gel pen.


 Week 46 - honey.  The quote on the back says "If you want to gather honey don't kick over the beehive."  Acrylic background, pen sketching and coloured with pencils. Simple but fun to do.


 Week 47 - feather. A simple background from painted paper and a collage of birds.


 Week 48 - vanilla.  My favourite type of vanilla is ice cream. Painted paper background and I glued on a separately sketched (with coloured pencils) ice cream cone.


 Week 49 - jingle. Painted paper background and a sticker. The stitching is white pen that I have outlined with pencil to make it look like real stitching.


 Week 50 - love. Painted background, collaged image and fine-liner quote.


Week 51 - stencil. I used texture paste through a stencil for the background. I painted it with acrylics, highlighting one key.
 

 Week 52 - loop. I chose to interpret loop as the infinity symbol, endlessly looping around itself. The card was stamped and embossed then coloured with sprays. The infinity symbol was cut out of cardstock then embossed in a machine. I painted it gold to stand out against the background. 

I am glad that challenge is complete, and really happy that I have a stack cards to look through when I need some inspiration. I haven't done a lot of art journaling this year but I have completed the ICAD challenge and this one so I feel like I have done some art. In total it is 113 cards. I like to think of them as mini journal pages.  

I am currently working on some textile art that I will probably share in the new year. I have also signed up for the documented life project for next year so I will be sharing a lot more art journaling then, along with techniques (I hope). I should still be posting over the next couple of months but it won't be as often.
 

Monday, November 10, 2014

Art with playing cards.


 Week 36 - paint.  I love to paint daisies so that was how I decided to do this card. I used acrylics and bubble wrap for the background then painted in the daisies. I outlined them with black pen and added some white highlights with the quote.


 Week 37 - ticking.  Acrylic background with pencil stripes. I used thin liner markers for the clock and more acrylics.


 Week 38 - garb.  I used a dictionary page for the background and topped it with cut outs of late 1920s fashion.


 Week 39 - concentric.  I used my cuttlebug machine to cut out the shapes that I layered over an acrylic painted background. I wrote the word on the other side of the card.


Week 40 - pencil. I used watercolour pencils to draw and fill in all the little squares on this card. There is a quote on the back that reads: "A #2 pencil and a dream can take you anywhere. " I love drawing and using pencils.

Monday, October 27, 2014

More challenge cards.

 I am sharing a few more of the cards I have completed for the 52 card challenge. I have to say this is one of the hardest challenges I have done because some of the words are not very art inspiring for me. I think they would be good writing prompts though or for larger journal pages where you have room to explore a theme better.

 Week 30 - trend. This card is painted with gesso and sprayed with metallics. I then added a chipboard heart from my scrapbooking stash. I embossed it with a cuttlebug and then painted it with metallic acrylics. I was feeling sparkly that day, lol. There is a quote on the back that says: "Don't follow a trend. Follow your heart."

 Week 31 - bracelet.  I sketched out some friendship bracelets on a painted card then coloured them with felt tip markers. I used Tombows because they always turn out a little paler when used over acrylic paint. I wanted a soft look.

 Week 32 - orbit.  The background is painted and then stencilled with Golden fluid acrylic for a shiny look. I added the quote and printed photo later.

Week 33 - low.  I found this quote with low in it to inspire this card. Simply painted with acrylics and a little pencil outlining.

Week 34 - dial.  I used flat acrylics for the background and stencilled on some Luminarte silks glaze for the shiny pattern.  I sketched out the phone and painted it with acrylics and some silver pen. I miss the sound of old phones that had dials.

Week 35 - wallflower.  I found this part of a poem that I decided to use for my card. I had a collage image of a women's head and bust that looked like it fit the poem so I cut it out to use. I had to lengthen the body with acrylics and add a little more hair but you can't really tell. I am pretty happy with how it turned out.

Wednesday, October 22, 2014

Using angelina film

As promised I am sharing the photos I took while making the peacock card for the 52 card challenge.


I first painted the card using the credit card technique. I put blue paint at one end of the card and used a plastic card to spread the paint across the card. I then did the same thing with a purple paint and you get the effect seen here. If you do it while the paints are both wet you get some mixing of color. I didn't do the second coat evenly so some of the original blue shows through the gaps.


This photo shows the Angelina film I used. It can also be known as Textiva film. I have had it a while but it is usually sold by textile retailers or maybe a mixed media supplier. I scrunched it up for texture and glued it to the card with white glue. The glue didn't seem to hold it well so I added a line of stitching around the edge to make it secure. When the film is heated it shrinks and pulls so I wanted to make sure it wouldn't come off.


I held the card with clips over a teflon craft sheet. I then used a heat gun to shrink and make holes in the film. I do this outside so I don't breath the fumes in. Leave it clipped down until it cools or the card may curl. I did not need to trim the film because it shrank to the stitching when I heated it.


You will notice the finished color of the film is very different to the color before heat is applied. You never know what you will get and that is part of the fun of using this film.

Tuesday, October 21, 2014

Finally some more art.

I didn't realize it had been so long since I shared some work. I have been busy teaching a little and also helping my daughter with her artwork. https://www.facebook.com/galaxiametal?fref=nf  I am now finished with those so I have a little more time for my own work. I also joined two textile art groups so I will be sharing some of my textile work occasionally.  I do like to vary what I make to stay creative.

I have completed quite a few cards (9 so far) for the 52 card challenge that I had fallen so far behind in. I will share 5 today and some more later on.
 Week 25 - peculiar.  This was a simple card. I painted it white and dribbled on some watercolors. I then turned the blobs into creatures (like Carla Sonheim does) with a pen and some shading, then added a few splatters as well. The technique is easy because the creatures are not realistic.
 Week 26 - around.  A simple acrylic painting and a quote to match.

 Week 27 - minimal.  I painted the card with a thick layer of gesso and while it was wet textured it with a heat gun. When it was bubbled up I painted on golden acrylics and added a scrapbooking definition.

 Week 28 - peacock. I was inspired to go with the peacock colors rather than the lovely bird for this card. I used angelina film to make the background and added some skeleton leaves on top. I did take a few step by step photos so if I can find them I will share them tomorrow.
 This view shows the leaves better and you can see how the color of the film changes depending on the angle of the light hitting it.

Week 29 - joker.  I went a little crazy with my sketch for this one. It is acrylics with some pencil shading.

Tuesday, August 12, 2014

Free lesson

If you have followed my blog for a while you know that I did the online Life Book class for the past two years and it is the main way I have learned so many different art journal techniques. I am not doing it this year because I am taking a break from classes.

Tam who runs the program has decided to share one of her lessons from this years class for free. Yes that's right, it it free. It is a great way to try the lesson and see whether it is your style of thing. I don't always do the lesson the way it is taught but I do normally use the same techniques. The lesson is only available for 1 week from 11 August 2014. I had a look and it is a very detailed lesson. There is two pages to do and all the worksheets are there to download too. Even if you can't watch the videos this week you can download them to your computer and do the lesson when you have more time or supplies.


Click on the link to go to Tam's page where she has the lesson.  This image is her page from the main part of the lesson. I have downloaded the lesson and will be doing my own version later in the week.

Wednesday, August 6, 2014

The final ICADs for 2014

The theme this week was paint. I decided to go free and not do prompts this last week. I did use book paper on most of the cards as well as acrylics.


 I highlighted a few words from the bookpaper and then quickly painted a few birds.


Another simple card made with strips of book paper.  I used Golden paints (yellow ochre and diox purple) and then finished off with mica spray. 


Angel was one of the prompts for the week so I sketched a quick one for this card. 


I used a stencil over the green paint to do the flowers, and outlined them with gold pen. I added a little gold embossing for interest. 


I used the stencils I made for the mono printing course to print my final card for the year. It turned out a little messier than I wanted but that is ok. It seems I have forgotten some of what I learned already. Lucky I have the videos to watch again.

ICAD has been a fun challenge to take part in again. It has been good to do small cards while I have been under the weather. I now want to do a few more random things so keep an eye out for more postings about that.