Sunday, December 20, 2015

Relaxing with doodles

Adult coloring books are the latest craze at the moment. People find it relaxing to sit a color. I remember the coloring doodle books that were big when I was a teenager. They were the same thing and I loved filling them in. These days I would prefer to do my own form of doodling and that is what I am sharing today. It is  a technique that I started with CathyB during 21 secrets and I have adapted it to suit my own creative style.
 
I started by collecting a big bunch of papers from my collection. I had a lot of prints from my gelli plate and printing class. I used some computer printouts of my own work that didn't print properly and a few pieces of paper that had been under my work to catch excess paint. There is even a piece of scrapbook paper there. You could also use magazine pages that have a lot of color on or catalogue pages. I tore them into smaller pieces but you could cut them if you want to.


For my journal I am using a small magazine insert, about 6 by 8 inches but it could be any size you like. I had read it and didn't want to keep it so I am giving it a new life as my doodle journal. You could use any book or journal you want to. The collage adds thickness and strength to the pages so it doesn't have to be thick paper.


I used acrylics to paint each page. It doesn't matter what you use because most of it will be covered over anyway but the paint adds a bit of strength to the page before the papers are glued in and seals the paper. I painted every second page one day then let it dry a day before painting all the other pages. You need to let the pages dry like this or they may tear.


When the paint was dry I decided that I wanted to do backgrounds of either warm or cool colors. This page is mostly cool colors but there are some little spots of warm here and there. I just lay out the pieces and move them around until I get an arrangement I like. It usually only takes a couple of minutes to do this.


I glued all the pieces of paper down with Liquitex matte medium. I don't worry if the edges are straight or if all the background is covered. The paint on this page was the purple color you can still see in places. I let the papers hang over the edge of the pages and later trim them to size when dry.


I did all the pages like this doing cool and warm backgrounds. The glue was drying quick enough so I could go onto the next page but I did put a piece of wax paper between the pages just in case they wanted to stick together. Then I left the whole book to dry again, standing it up so the pages would not stick together and the air could get in there.


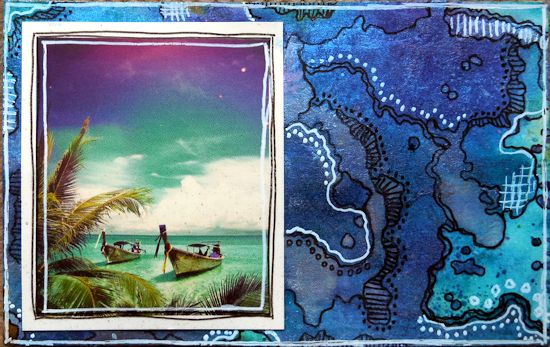
The final step before the doodling begins is to glue in images I have cut from magazines. I used flowers on these pages but I also chose birds and other images. I just choose images that I really like and want to save before I throw a magazine away.

I usually put the warm images on the cool backgrounds and vice versa. It makes the flowers stand out more. I did that to the whole journal so now when I feel like making some art  and don't have a big project to work on, I have a book of half done pages to get me started. 


This page is done on the cool purple background that I showed above. I add washi tape (because I have a lot of it) over the edge of the papers to make a grid for doodling. I also added a few deli paper hearts that were left over from some other project and a few small stickers (circles, hearts, stars and words). Finally I get out a bunch of acrylic paint pens and gel pens and doodle all over everything. I added leaves to the flowers with the paint pens. Some of the washi tape is colored in, some of it is left plain. I outline almost everything with black pen and add a lot of white highlights. Sometimes I use markers to change the color of something. You can have a lot of fun with this technique. You can do a formal grid or let items overlap each section like I have.

I hope you enjoy being creative over the holidays and have a great time with friends and families. I will return in the new year with some more art. Have fun.

Tuesday, December 8, 2015

Experimenting with Kunin felt

 I am sharing some textile work today. I took part in a challenge for my textile group ATASDA to use Kunin felt in a textile piece. It is an acrylic felt so that means it will burn and distort with heat, unlike wool felt that won't change. I used some felt that had a pattern embossed on it by the manufacturer. I think the altered felt here would look great as a journal cover. Either sew a loose cover or glue it straight onto a hardbound journal/book.

   
 I put it flat on a baking tray that was protected with alfoil and baking paper. I sprinkled on silver embossing powder all over the felt.

 I used a very soft, large, clean paint brush to gently sweep across the felt so the embossing powder would fall into the embossed areas and I could see the blue felt again in the raised areas.  

 I put the tray in the oven at a low temperature (about 150C) and left it for 10 minutes. It was still a little unmelted so I left it a further 5 minutes to melt completely. I took it out of the oven and let it cool before using it in my piece. I was really pleased that my experiment seemed to work and only the embossed areas were silver.  

 In a different experiment I tried to spread paint over the embossed areas with a palette knife but it didn't work too well. I wrapped paper towel around a wooden block and used that to spread the paint around.


 It is a far more patchy look than with the embossing powder which may suit some projects but not the one I had in mind.  

This piece of felt was cut out with a wood burning heat tool.  I used a stencil for the design and enlarged the pattern using my computer. 


 This is the final picture for the challenge. I layered the different felts over a piece of sari cloth. It is very sparkly in real life.

Wednesday, December 2, 2015

Art journal pages for DLP

 My intention to blog weekly went a little astray last week. Our main computer died suddenly even though it is a SSD drive that is supposed to be extremely reliable. The computer guy who built it said it was the first time he had seen a broken one in 20 years of working. We were just unlucky I guess. Fortunately I have the backup set up to run weekly so we only lost a few documents and none of our photos. It did take a long time to download all our programs again and set them up the way I like. If you haven't done a back up recently I urge you to do one soon.

 Now that I am back I will share some more journal pages. These are more of the Documented Life Project pages.


The challenge for this page was silhouettes and the prompt was "no shadow without the light". I used a credit card to scrape paint across the page for the background then used a stencil to do the flowers silhouette. I used a marker to fill in the lines of the stencil so it was a solid shape.


The art challenge here was to use deli paper. It is a very thin tissue paper with a waxy feel on one side. The waxy side is actually a thin coat of plastic. You can paint on either side but sometimes the paint comes off the waxy side. I used some monoprints I had done previously and just added the quote. It was a very quick page.


The challenge for this one was to use vellum and the prompt was "Sheer genius". I drew the big butterfly on vellum with a permanent marker then all the little ones too. I colored it in on the back using water-based markers so the colors are a little muted. I stitched the vellum butterfly onto white paper, I cut it out and glued it to the page. The page looked a little bare so I added the border as  finishing touch.

Sometimes I surprise myself with the ideas that pop into my head when I find a quote like this one. I would never have dreamed I could do this sort of page a few years ago.

I will probably share a some of the textiles I have been playing with next week so I hope to connect with you then. 

Monday, November 16, 2015

Catching up with DLP

 Today I am sharing a few more journal pages.


 The prompt for this page was about what advice would you give to your younger self. I tried to paint the whole page using only acrylics but in the end added some colored pencil for shadows. I was experimenting with some lettering too.


 I used acrylics and pencils for this page. I started with a photo of myself but it looked odd so I made the eyes bigger and lowered the shoulders. I have been doing too many whimsical faces and want to do more realistic portraits but it is going to take me a while to get used to the different proportions. That might be something I concentrate on next year.


 I did a whole page transfer of a wildflower photo I took. I used TAP (transfer artist paper) paper for the transfer and it only partly worked because of the texture of the paper in my journal. It was hard to see the flowers so I went over them with watercolor pencils but left the background mottled. I was happy with the way it turned out in the end. 


 This page started out as another transfer. I covered a picture with gel medium and left it to dry then turned it over and wet the paper on the back. I rubbed the paper off to leave an acrylic skin with the image stuck to it. I think I didn't allow the gel medium to dry for long enough before I removed the paper. When I glued it into my journal the colors all ran together and it was hard to make out the image. I decided to keep this as my background. I painted some sunflowers using transparent Golden acrylics (I read the labels to work out which ones were most see through) and pen. I dabbed on some glitter glue to the flower centers because the prompt was about all that glitters. Another journal page done.

It seems that most of my journal pages start out with one idea that often goes wrong so I just keep going until I get something I like. There are no mistakes in art and if you learn to not worry about it as you are going along you will have a lot of fun. Happy creating and I will catch up with you next week.

Tuesday, November 10, 2015

Art journal pages...watercolor and mixed media

 I am sharing some of the watercolours that I have done in my journal each month this year. I got the idea from Gina Rossi Armfield's No excuses art journaling book.


This was June. I used some of the suggestions from Gina's book to decide what to draw and added some seasonal images of my own.


July was a cold month here in Australia so I drew some of the flowers that were blooming then.


August was warmer than usual so we saw the arrival of lots of flowers. It was difficult to limit myself to only a few.


I had a little fun with the springtime animal sketching in September.


A DLP page with the prompt about seeing clearly. I used the quote "...one can only see clearly with the heart. Anything that is essential is invisible to the eyes" to inspire my page. I gessoed and used pan pastels for colour. I added detail with coloured pencils.


Another DLP page inspired by the prompt "If you are going to be weird be confident about it". I glued patterned tissue paper to the page and sprayed it with ink. The characters are painted with acrylics. It was a lot of fun to mess about with the girl and cat.

Tuesday, November 3, 2015

A new journal page.

Today I am sharing a journal page I did for the Documented Life Project. The art challenge was to use tissue paper and the prompt was 'disappearing trick'.

I found a quote that I liked so that inspired me to do a flower garden. I searched through my stash of printed tissue paper but couldn't find any nice flowers that I wanted to use so I looked through my napkin collection (every art stash hoarding journaler has one, don't they?). I chose a few different napkins and tore the flowers out. I did trim around some of the flowers with scissors.

I first painted my page with white gesso then sprayed on colour with the dylusions spray. When it was all dry I arranged my flower cut outs to look like a garden bed.  I used matte medium to glue down the napkins and left it to dry.

 Uh oh. I knew that the napkins would become transparent when glued down but I didn't expect the dylusions spray that was mixed with the gesso to become bright green and change the flower colours. It was difficult to make out the flowers now so I decided to colour over everything with my prismacolor pencils. I was hoping the creamy wax pencils would cover up a lot of that green and also make the flowers more prominent. I also added some extra leaves in the blank areas and extended the flower stems so they reached the bottom of the page. It was a lot of fun to colour this way. Now I am happy that the page looks the way I imagined. 

 I will share some of my other pages and art I have been working on soon. I am planning to update my blog on Tuesdays from now on so that it forces me to be more regular about updating. I may even add extra posts in between but don't hold me to that.

Sunday, August 16, 2015

Index Cards galore.

I have been a little slack updating my blog lately. I think I am trying to do too much and it is making me freeze and not do anything. I take on lots of new projects and then get lost not knowing what I should do. I am deciding what is important to me and letting other things go but it is hard for me because once I start a project or challenge I like to finish.

week 9
  I did the Index Card a day challenge again this year. It will probably be the last year for me. Why? I just didn't find it interesting this year and so it will be one of the challenges I will stop doing.  Well...maybe stop doing because I may change my mind next June, lol. I would normally follow peoples links to their pages from the facebook group but as links were banned this year I couldn't connect with other artists like I did previously. It took a lot of the inspiration and discovery away for me and made it seem less fun because I didn't feel the need to check the facebook group as often.

week 1 periodic table
 I did enjoy making my cards and have prepped a few extras so that when the mood takes me I have a quick little card to do to get me in the mood for larger art pieces. I was going to do my own thing this year but when the first week of prompts were listed I was inspired to give them a go. As the challenge went on the prompts did not always appeal so I did my own art then. 

I have only shown a few of the cards here. I have loaded all 61 cards onto my flickr page so if you want to see the other cards they can be found here: https://www.flickr.com/photos/artygirl/


 Week 1 was drawing and this is a plan of our garden.


Week 2 was paint and all the prompts were colors so I did abstract doodles most of the week.


Week 3 was collage. This was route 66 in my town. 


 Week 4 was patterns. This prompt was exotic.


Another week 4 prompt - dramatic


Week 5 was mark making using stamps, tape and stickers. I didn't follow prompts this week. I used washi tape on all the backgrounds and stamped on them. I then colored and added details with acrylic paint markers. These cards were a lot of fun and something I will do again. 


Week 6 was to use a different color each day. I did a collage of similar colored pictures each day and doodled to fill in blank spots on each card. I really enjoyed this technique as well and got to use some of those random images I have been saving. 


 Week 7 was typography. I did follow the prompts again this week.


Week 8 - maps. I followed prompts this week so I could use the maps in various ways. 


 The last week was meant to be sketching but I found these picture cards in my stash and wanted to use them so I doodled backgrounds to match the photo colours. 

I enjoyed my time making cards this year but the fun of the facebook group seemed to be different this year...maybe because it has become so large. Or more likely because I didn't have time to keep up with the posts this year. I am thankful that Tammie hosts the challenge each year but it may be time for me to do something different next year. 

Sunday, July 26, 2015

Documented Life Pages

 I have done a few more DLP pages in my art journal since my last post.


This one is sketched then painted with watercolor over gesso. I would prefer not to gesso the page when I use watercolor but the paper in the journal I am using draws the color right through to the other side so I have to use the gesso to stop it bleeding through all over the place. This is a simplified sketch of my front garden and home.


I used acrylics for this page. I stenciled the background then painted the woman. I used a magazine image to draw the woman and she doesn't look anything like the photo. Lucky for me it doesn't matter. The writing was initially green but it didn't stand out so now it is white. Never be afraid to change things in your art if they are not working.


The prompt for this page was time. I wanted to use a clock stencil I have so I first used texture paste through the stencil. When that was dry I painted the page with red ochre and yellow ochre acrylics. I know that purple on top of yellow makes a rusty color so I sprayed on some dylusions purple and also some moonshadow spray in a purple color. When it dried I used clear gel medium through the stencil again and let it dry. The clear gel makes the colors underneath seem darker because they look the same as they do when they are wet. I had to find some flat areas to do the writing which was hard on this textured page. I used tracing paper first for the writing to make sure it would fit. Then I just wrote out the quote in gold and outlined it with black.

Next time I will share some of the index cards I have been doing and I have a couple of textile tutorials too that I have been saving. Thanks for reading.